Arctic
Use newspaper wads and Plaster Cloth to make icebergs and ice floes. Leave room between the ice floes for water. Paint the water area blue. When dry, add Realistic Water over the blue water area. Sculpt penguins or cut out photos of penguins from magazines and add them to the diorama.
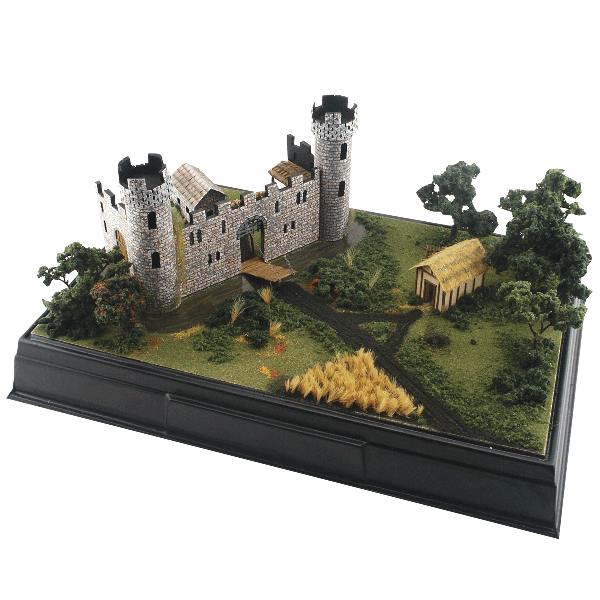
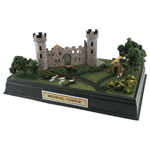
Castle
Use Foam Board to make the castle. Score the brick or stone wall lines with a hobby knife (with adult supervision). Flex the board slightly and then paint the castle. To bring out the brick or stone, use a black wash over the entire castle. The black will seep into the scored lines and emphasize them.
Pioneer Trails
Using a Desert Sand ReadyGrass Sheet and Desert Plants, make an early pioneer trail. Make “ruts” in the trail where covered wagons rolled along, by scraping off the sand and adding brown and black paint in the ruts.

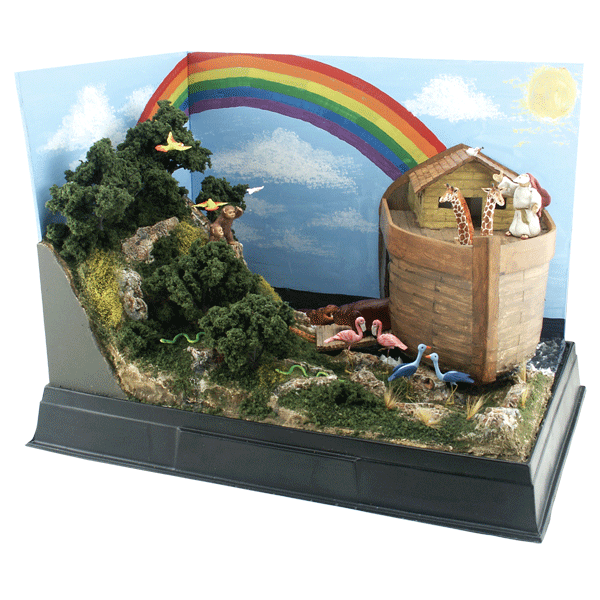
Noah's Ark
Sculpt your animals two-by-two from Sculpting Clay. Create the Ark from Project Board. Add some receding water using Water Effects and finish by landscaping some new growth. Finish by painting all of your animals and then putting God’s symbol of His promise – the rainbow – in the sky!
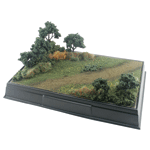
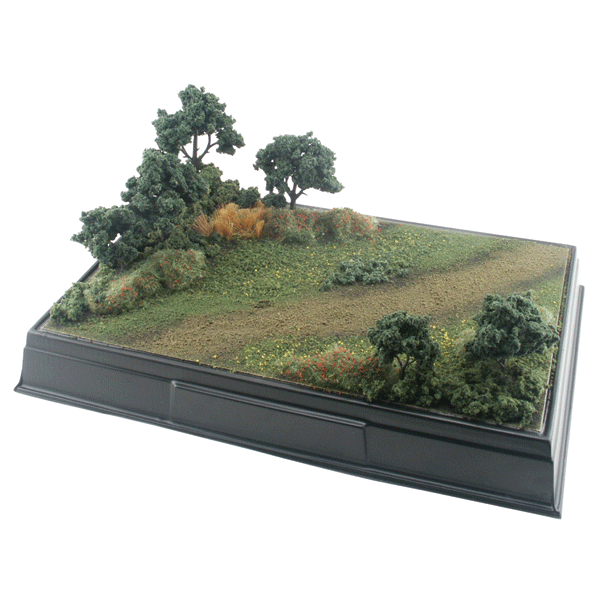
Basic Landscaped Dioramas
Make basic landscape with a ReadyGrass Sheet and Foliage & Grasses. Add vines, tall grasses, trees, bushes and flowering vines and fields.

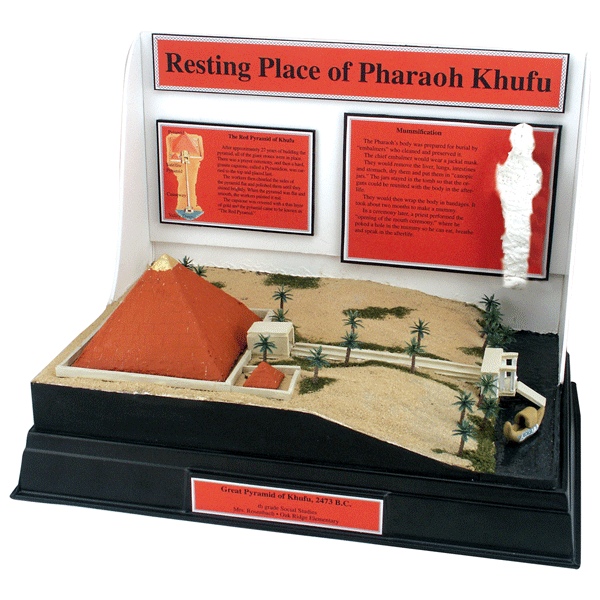
Pyramid Dioramas
Use a Desert Oasis Diorama Kit or a Desert Sand ReadyGrass Sheet on a Project Base & Backdrop or a flat surface. Build up the pyramid and cover it with Plaster Cloth. Add palm trees, sculpt a boat for the oasis and add a causeway. Don’t forget to label your project!
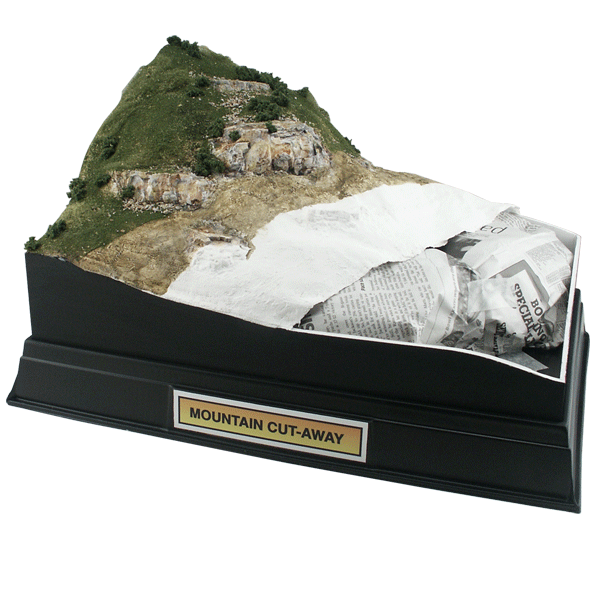
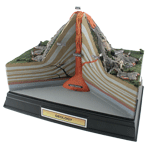
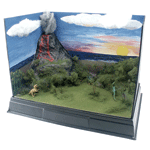
Cut Away Volcano
This volcano was built using the Mountain Diorama Kit. Put your diorama on a spinner to see the outside of the mountain on one side, and the inside of the volcano on the other side. Create the volcano using the Plaster Cloth over wadded newspapers, then landscape over the volcano. Pour Casting Plaster over the volcano and when it dries, paint the cooling top layer of the lava gray and the molten bottom layer orange/red.
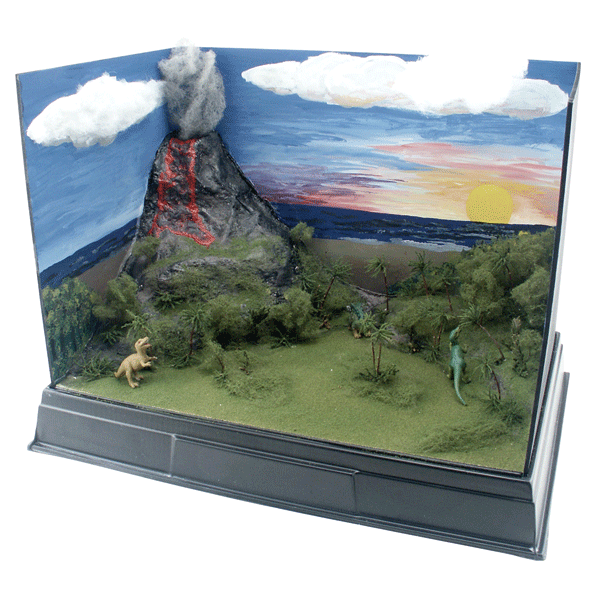
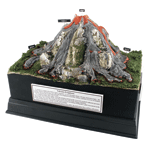
Volcano
Set this diorama on a revolving mechanism so your viewers can see all sides of the volcano! Build up the volcano with newspaper wads and wet Plaster Cloth and use the Side Panels in the Mountain Diorama Kit to make the flat inside of the volcano. Use Project Paints to color the strata layers and the magma flow up to the surface. On the outside of the volcano, add landscaping and then pour Casting Plaster down the sides of the volcano. Paint the lava – gray on the cooled part and orangeish-red on the still molten part.
Animal Habitat
Use the Water Diorama Kit to make water areas. Build the terrain up with newspaper wads and cover them with Plaster Cloth

. Color the water area and when dry, add submerged items like logs, junk and rocks. Brush a thin layer of Realistic Water from the middle out to the banks. Add landscaping, trees, animals and lots more detail!
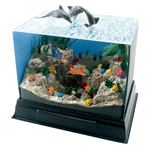
Complex Aquarium
For the complex aquarium, use a Project Base & Backdrop to make the outside of the aquarium. Put a Plexiglas® top on it. Sculpt dolphins from Sculpting Clay. Cut one dolphin in half and glue half on top of the Plexiglas and the other half underneath. Sculpt waves and splashes around the dolphins with Water Effects. Sculpt turtles, sharks, stingrays, coral and sea vegetation with Sculpting Clay. Use the Project Paints to paint the deep-sea background.

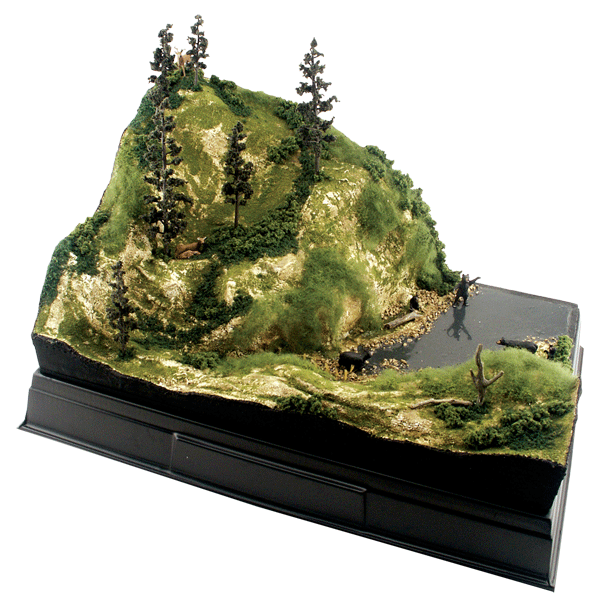
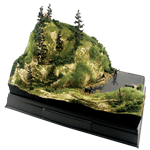
Mountain or Volcano Dioramas
Build up mountains, volcanoes, craters, caves and more with newspaper wads and Plaster Cloth. Cover the white, dried Plaster Cloth with earth-colored paint and then landscape the diorama. Detail with trees, figures, structures and more.
Castles and Structure Dioramas
Use the Building & Structures Kit to create any kind of structure, such as brick, stonework, wooden, etc. You don’t necessarily need to build the whole structure. Sometimes you can just build the façade (face) of the building to get the idea across. Always add landscaping and pathways or roads to structures, where people and animals have traveled. Don’t forget to detail with figures, animals and more!
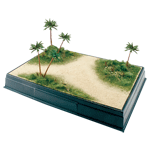
Desert Dioramas
Build a desert oasis on a Project Base & Backdrop (or a flat surface) and add a Desert Sand ReadyGrass Sheet. Add Palm Trees, bushes, tall grasses, vines and rock debris to create the oasis. Get Desert Plants to add cacti and other desert vegetation.
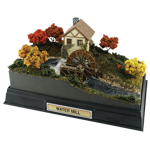
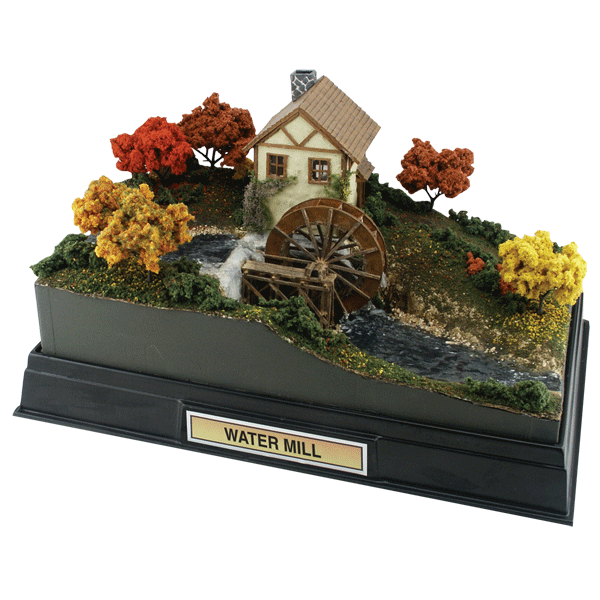
Water Power Dioramas
Use the Water Diorama Kit to create your terrain with water. Make the building and waterwheel with the products in the Building & Structures Kit. Add Autumn Trees for a seasonal effect!
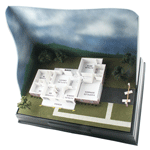
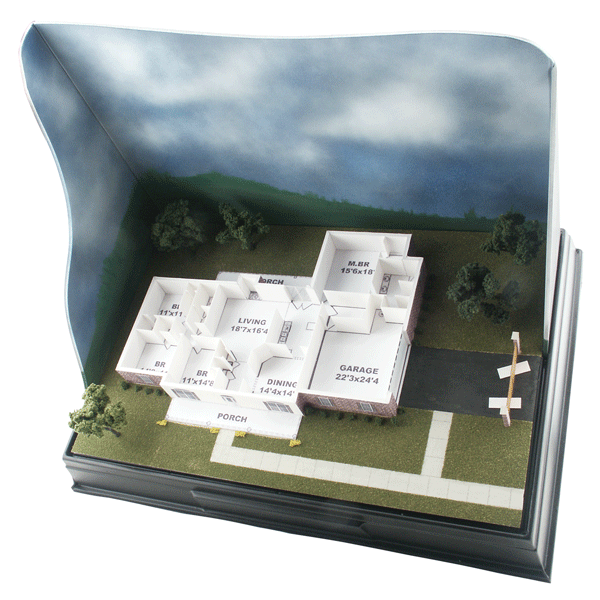
Floor Plan Dioramas
Start with a Project Base & Backdrop and add a ReadyGrass Sheet on top. Use Project Board to make your floor plan. Label each room. Scrape the turf away from areas for the driveway, sidewalk and porch. Paint these areas. Add landscaping – don’t forget foundation plants for a realistic effect!
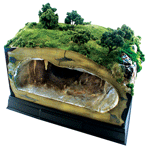
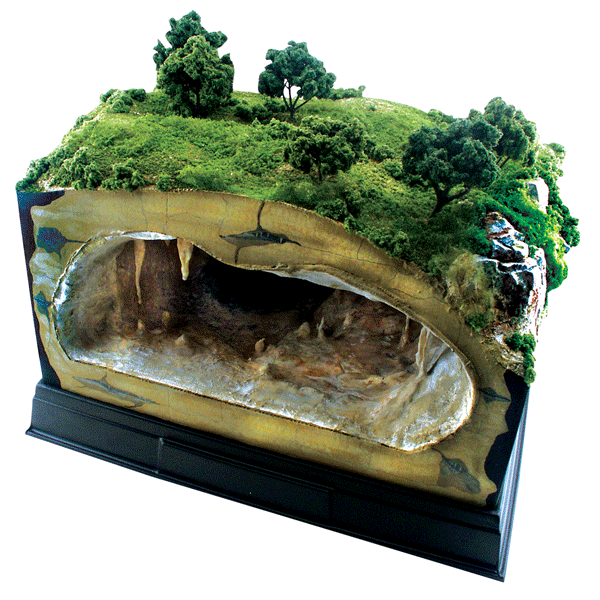
Cave Dioramas
Build caves and other underground subjects with newspaper wads and Plaster Cloth. Create stalactites and stalagmites by rolling wet Plaster Cloth in the general shape. Glue them to the top and bottom of the cave. Sculpt bats and suspend them using Project Wire. Landscape the earth over the cave and paint in water tables and rock layers in cutout areas (surrounding the cave) using Project Paints. It would be really cool to add spelunkers (cave explorers) coming from the back of the cave!
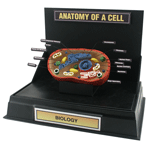
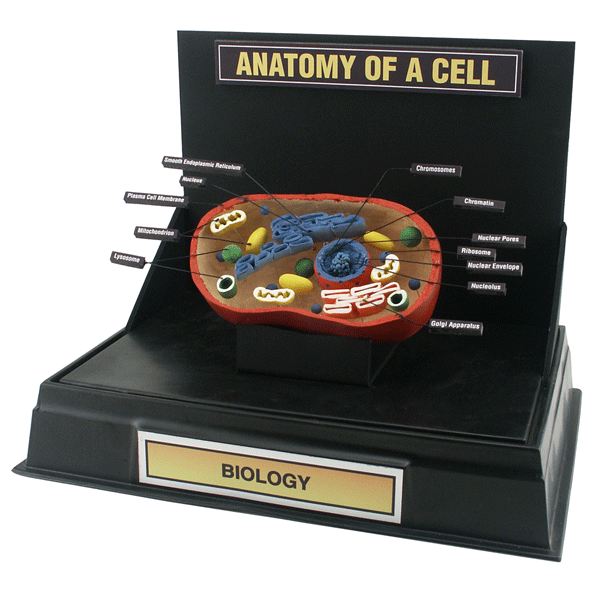
Science Dioramas
Really cool displays of cells, DNA chains and other scientific subjects can easily be sculpted with Sculpting Clay and Plaster Cloth. Form wadded newspapers in the shape of the cell and add wet Plaster Cloth strips. When dry, cut the cell and take out the newspapers. Use Project Paints to color the outside and the inside project parts. Display the cell on a Project Base & Backdrop. Suspend and label the painted parts with Project Wire.
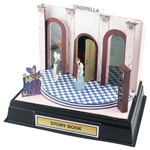
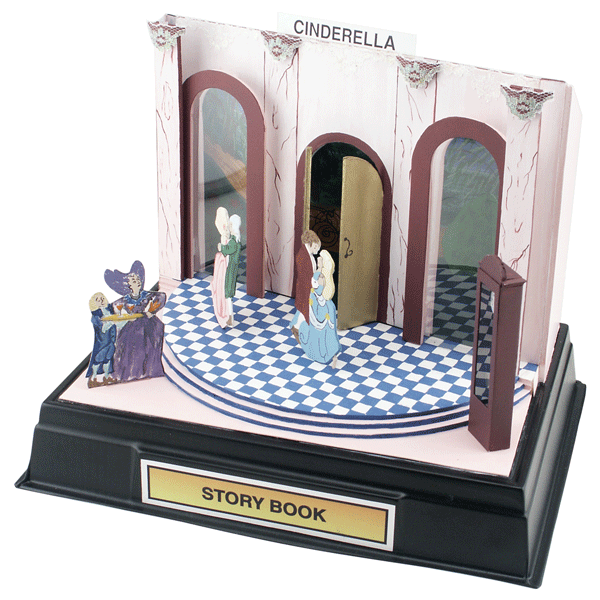
Storybook Dioramas
Create a scene from your favorite storybook. Cut out figures or create your own with Sculpting Clay. Make a grand ballroom entrance using the Building & Structures Kit. Create the clock and set it at about three minutes until midnight for a great detail. Use the Clear Plastic to make the windows, so you can see the carriage waiting for Cinderella outside!
Water Scene Dioramas
Use the Project Base & Backdrop and the Water Diorama Kit to make beautiful scenes with water areas, such as waterfalls, waves, splashes, rivers, lakes and the ocean. Model either still or moving water effects!
Board Game Dioramas
You can make incredible, unique board games based on stories, you and your friends or other subjects. Use the Building & Structures Kit to make the game parts (spinner and moveable pieces). Set the game on the Project Base & Backdrop for a cool display!
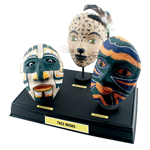
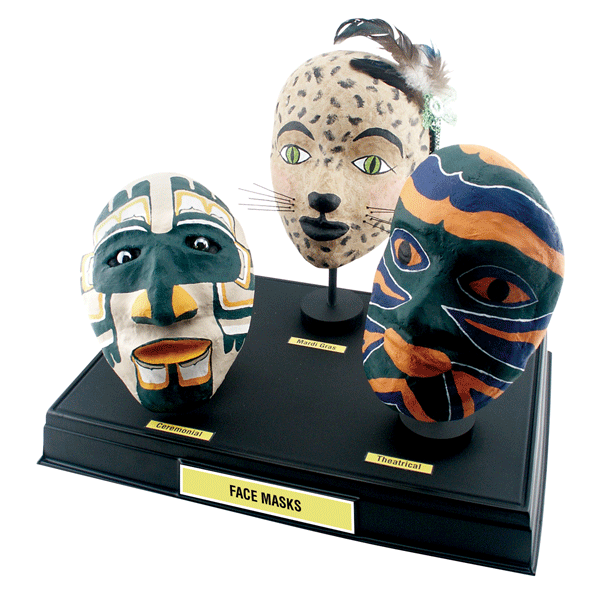
Mask Dioramas
You can display colorful tribal masks or other kinds of masks on a Project Base & Backdrop. Just create labels or use the Backdrop behind the masks to label your masks.
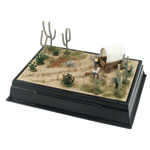
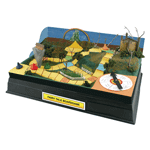
Pioneer Trail Dioramas
Start with a Project Base & Backdrop and add a Desert Sand ReadyGrass Sheet. Use materials from the Desert Plants package to add cacti, scrub brush, vines and more. Build a covered wagon using the materials in the Building & Structures Kit. Add pioneer figures or sculpt your own!
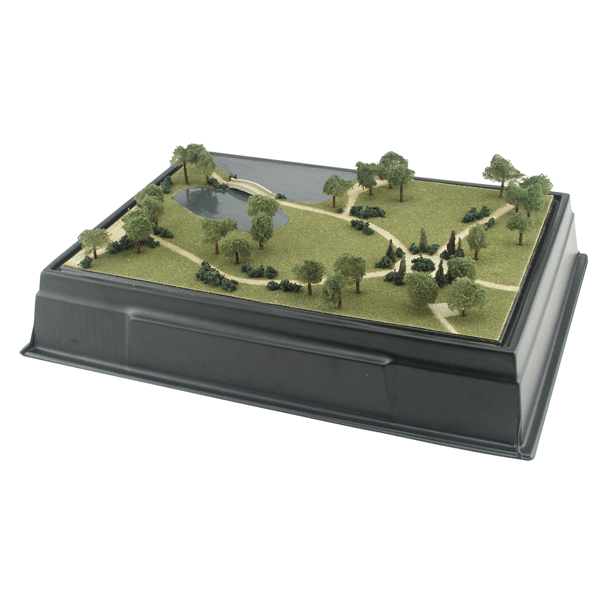
City Park Model Diorama
Start with a Project Base & Backdrop and add a ReadyGrass Sheet. Scrape away the turf in the road, path and water areas. Paint the water areas and pour in Realistic Water from the Ripplin’ Water Kit. Build a bridge and add great trees and bushes. Visit the Detail Examples to learn how to make cool landscaping hedges and conifer trees.
Great Horizon Dioramas
No project is complete without a great looking background. Use the Backdrop that comes with the Project Base & Backdrop. Use Project Paints to color beautiful sunsets, dark cloudy skies and much more. Blend the landscape in with the background so it looks realistic, like it is one continuous scene.

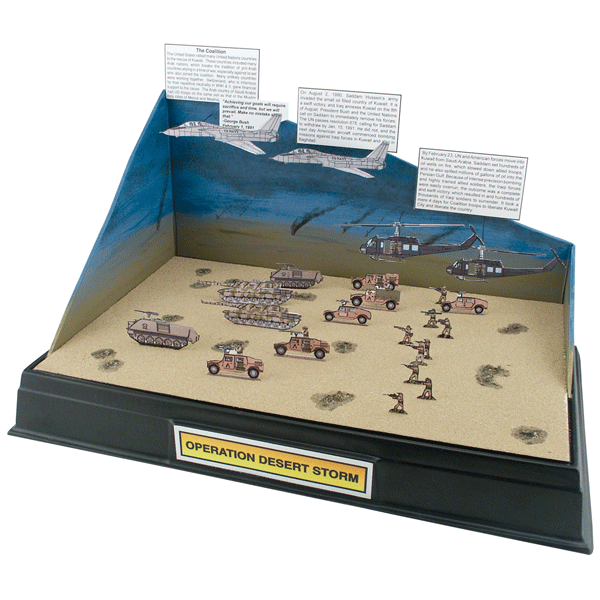
Modern Military Dioramas
Start with a Project Base & Backdrop or any flat surface. Keep in mind the location you are modeling and add sand, grass, hills, mountains or other terrain. Use cutouts or figures and automobiles to create the troops and their vehicles. Suspend helicopters and planes with Project Wire! Use Project Paints to add the backdrop of war, such as burning oil fields, bombed areas, mountains and hills.
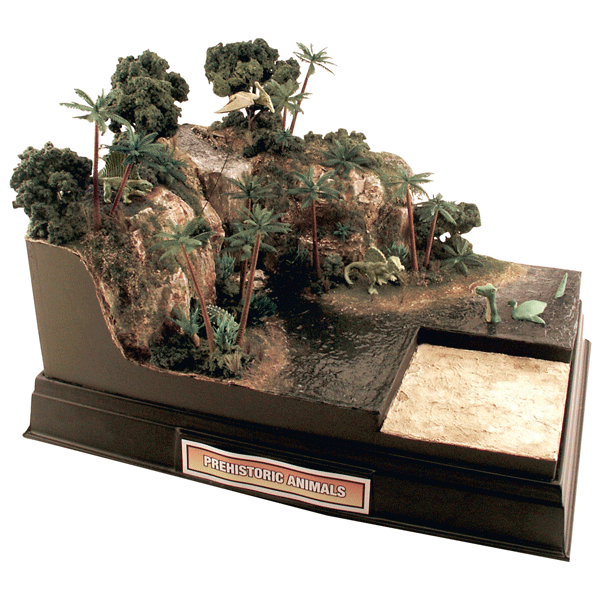
Dinosaur Habitat Dioramas
You can add so much detail to one diorama! Use the Water Diorama Kit and a Project Base & Backdrop to build the habitat. Add cliffs and tall Palm Trees. Add a submerged dinosaur, and save clay, by only sculpting the parts that are sticking out of water. Create an excavation site, showing the fossil of a fallen dinosaur. Suspend a pterodactyl in the air with Project Wire!
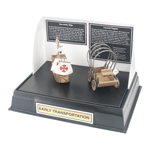
Early Transportation Dioramas
Use the Building & Structures Kit to create a covered wagon and a ship, which were used as early transportation methods. Use Project Board to make the hull of the ship and the bed of the wagon. Use White Plastic to create the wagon’s hoops. The Project Cloth is great for wagon covers and the ship’s sails! Paint the nautical insignia of your choice on the sails. Display and label the diorama on the Project Base & Backdrop.

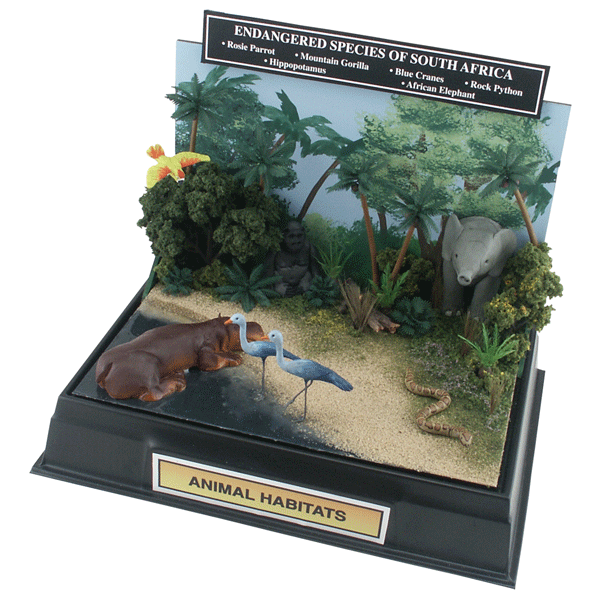
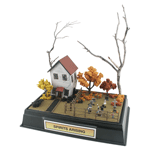
Endangered Species Dioramas
Start with a Project Base & Backdrop and a Desert Sand ReadyGrass Sheet. Use Project Paints to paint your backdrop according to your project’s environment. Sculpt your endangered animals. Add a three-dimensional look by making some of your animals appear to be coming out of the background, such as the African Elephant. Add trees and paint your sculptures. Use Project Wire to let the Rosie Parrot fly! Add some water for the hippo to lie in.
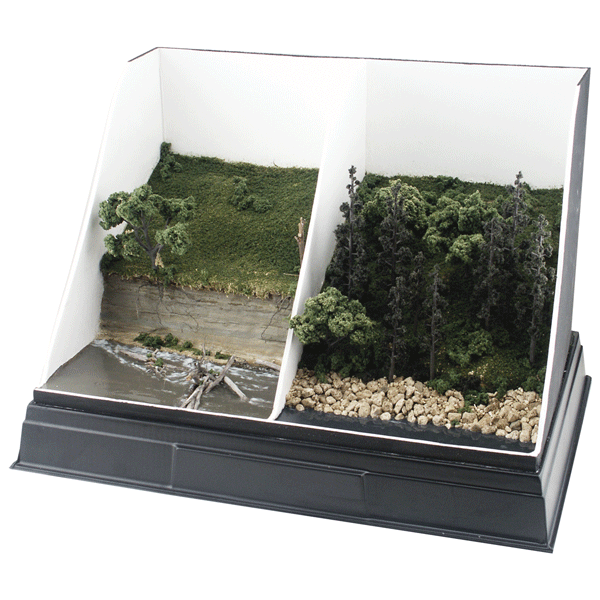
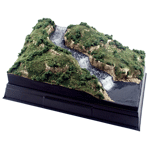
Environmental Dioramas
Create a diorama of the effects of erosion and the solutions for erosion. Build up the hillsides with newspaper wads and Plaster Cloth, then add landscaping. Paint the exposed dirt with earth colors. Add twigs and sticks in the water to model logjams, then brush Realistic Water around the logs. Use Water Effects to make waves and splashes. The solution side has rock on the banks, called “rip rap.” Use Talus for this effect.
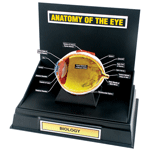
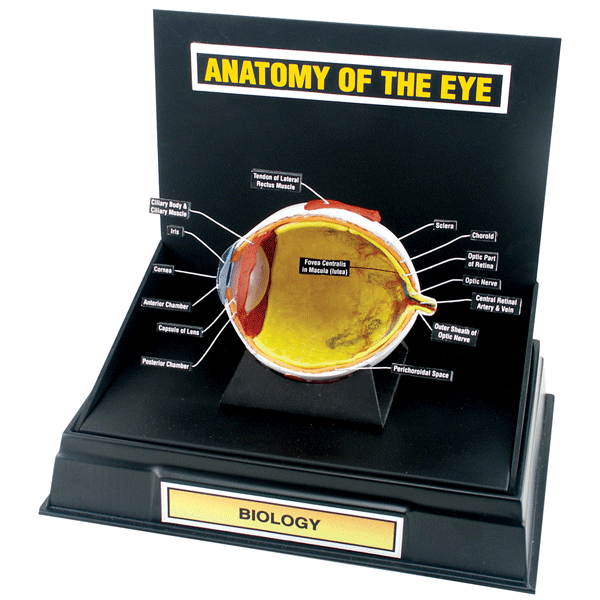
Anatomy Dioramas
Anatomy displays of the eye and other scientific subjects can easily be sculpted with Sculpting Clay and Plaster Cloth. Form wadded newspapers in the shape of the eye and add wet Plaster Cloth strips. When dry, cut the eye shape in half and take out the newspapers. Use Sculpting Clay to line the inside. Use Project Paints to color the outside and inside project parts. Use Clear Plastic for the eye lens. Display the eye on a Project Base & Backdrop. Suspend labels with Project Wire.
Halloween Dioramas
Start with a Project Base & Backdrop and add a ReadyGrass Sheet on top. Make your Haunted House and fence with materials from the Building & Structures Kit. Gather some dead twigs from you yard for the spooky trees. Add some Autumn Trees for seasonal effect. Sculpt tombstones with Sculpting Clay. Don’t forget to add the names of the spirits on the tombstones! Boo!
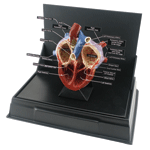
Heart Dioramas
Anatomy displays of the heart and other scientific subjects can easily be sculpted with Sculpting Clay and Plaster Cloth. Form wadded newspapers in the shape of the heart and add wet Plaster Cloth strips. When dry, cut the heart shape in half and take out the newspapers. Use Sculpting Clay to form the inside arteries. Use Project Paints to color the outside and inside project parts. Display the heart on a Project Base & Backdrop. Suspend labels with Project Wire.
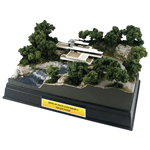
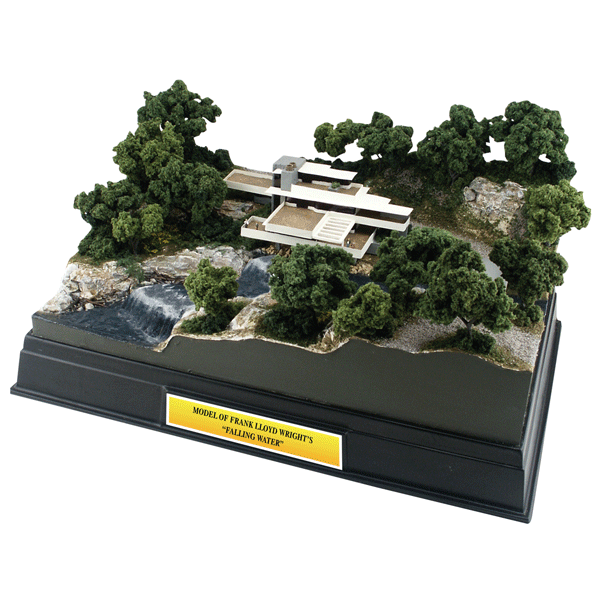
Architectural Dioramas
Pick your favorite architect and make a model of their designs, or create your own great architecture. Use the materials from the Building & Structures Kit to make the structure. Don’t forget to use the best Diorama Kit for your locale. The Frank Lloyd Wright “Fallingwater” diorama was made with the Water Diorama Kit. Add great trees and landscaping too!

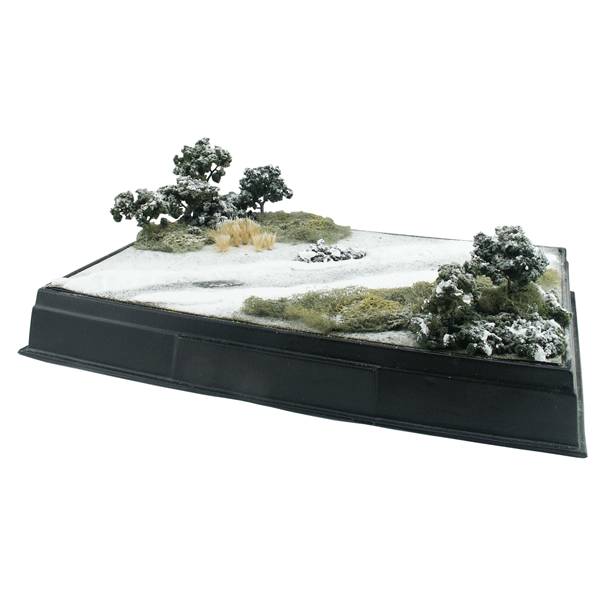
Winter Weather Dioramas
It’s easy to add snow and ice to any scene. Use the Snow Flakes and Project Glue from the Winter Effects package to create this light dusting of snow. Remember, when you do light snow effects, that the snow doesn’t always reach the areas under trees.

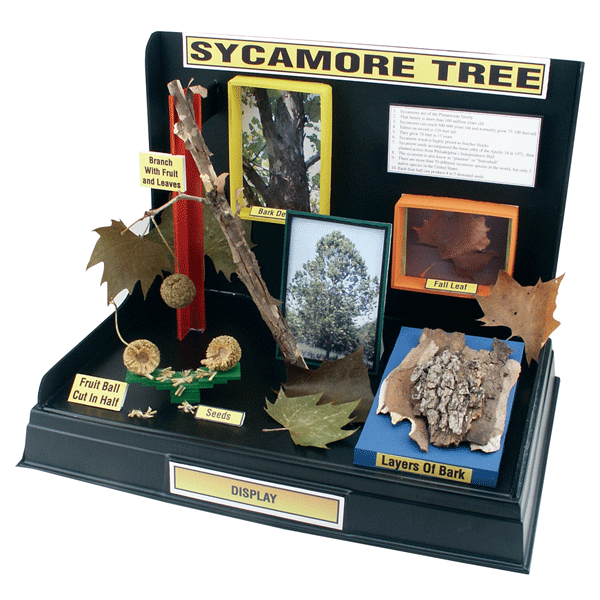
Sycamore Diorama
Use a Project Base & Backdrop for the display. Gather information and actual tree samples, such as the bark, fruit, flower, leaves and more. Make interesting, colorful frames using the materials from the Building & Structures Kit. Label the project parts and use photos when you can.
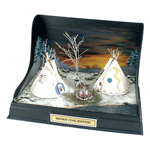
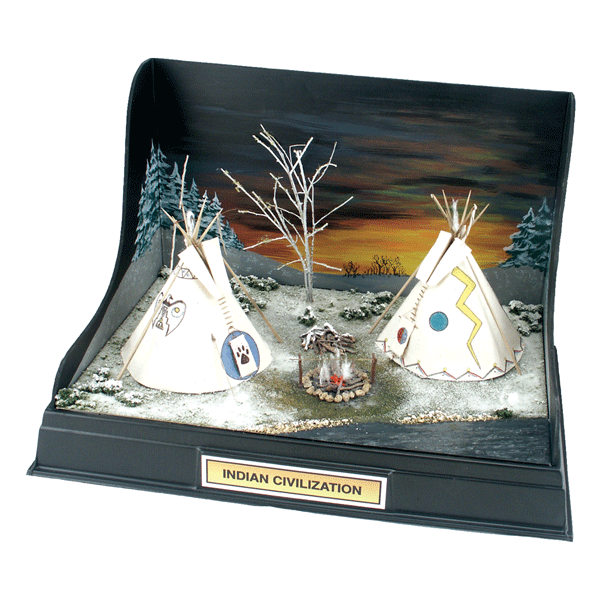
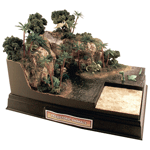
Indian Village Diorama
This diorama was built on the Project Base & Backdrop and the tepees were created using the materials in the Building & Structures Kit. The sunset background was painted to match the scene and Winter Effects were added to the scene.

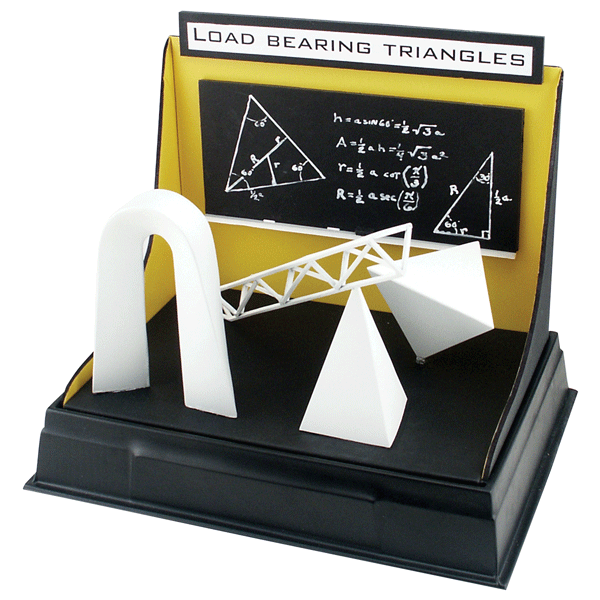
Load-Bearing Diorama
Mathematics can be fun (so I’ve been told :o) because you can create wonderful, strong structures using mathematical methods. Use materials from the Building & Structures Kit to create load-bearing triangles, arches and other shapes. You can get chalkboard paint to create the mini-chalkboard shown here. Use chalk to proove your theorem, or make your display interactive, where others must proove your theorem!

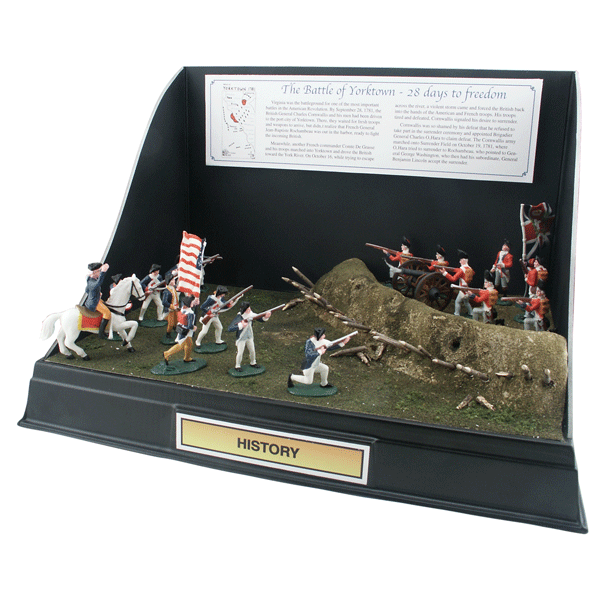
Military Dioramas
Start with a Project Base & Backdrop. To make bunkers, wad newspapers and add wet strips of Plaster Cloth over the top. Sprinkle Accents over the top. Poke holes in the bunker and add slightly sharpened sticks to make a constraint for the encroaching armies. Add your own figures or cut out images of soldiers and add them to the diorama. Label your project with information about the battle. Also see Modern Military Dioramas above!
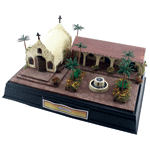
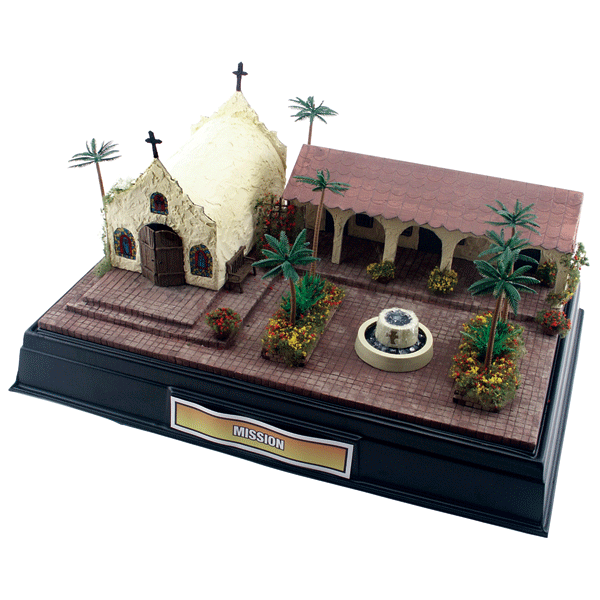
Mission Dioramas
Create beautiful mission dioramas using materials from the Building & Structures Kit, Palm Trees and other landscaping items. Make the water in the fountain using the Ripplin’ Water Kit materials. Make a stucco texture on your building with Plaster Cloth. Just apply it dry on the building and use a brush to add water, then pinch and push with your fingers to texture the building.
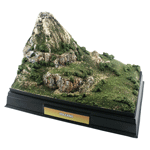
Sleeping Volcano Dioramas
Use the Project Base & Backdrop and the Mountain Diorama Kit to make a “sleeping” or dormant volcano. Build up the volcano using newspaper wads and Plaster Cloth. Add some rocks and vegetation around the volcano – evidence that no eruptions have taken place in a long time! Don’t forget to label your project.
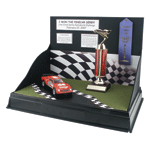
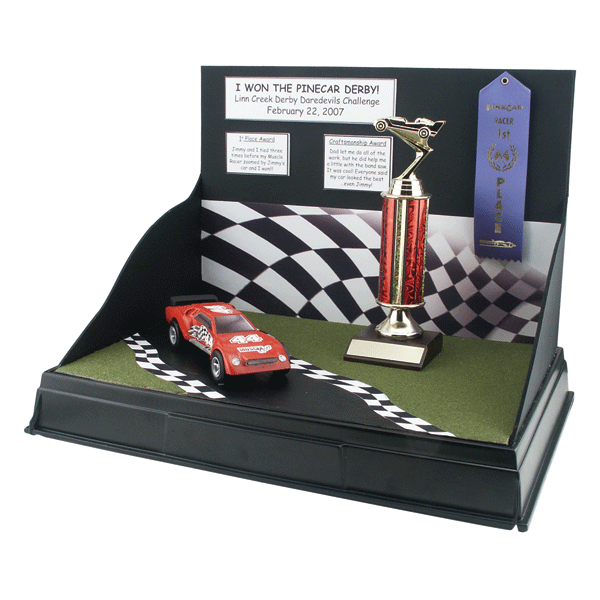
Show and Tell Dioramas
Use the Project Base & Backdrop to display collectibles. Collect ribbons and other souvenirs from the event and add them to the background. Create graphics that match the event, like the racing motif here. Add your trophy and racecar, etc. For the base on this display, we used a ReadyGrass Sheet. Scrape off the turf where you want to add the road and checkerboard, then paint on asphalt and checkerboard effects with Project Paints. Don’t forget to tell the story with some journaling!
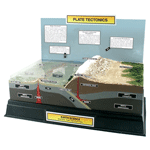
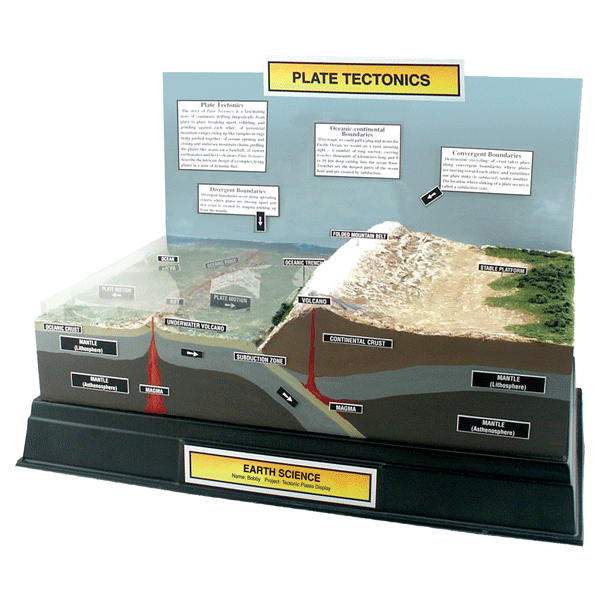
Tectonic Plates Diorama
Build your Earth Science diorama on a Project Base & Backdrop. Build up the ocean and terrain with Plaster Cloth. Use the Side Panels to make the facing label so you can identify the plate boundaries, mantle, magma and more. Use Clear Plastic to represent the water, so you can see the movement of the plates and ocean floor below. Don’t forget to add labels and landscaping where needed.
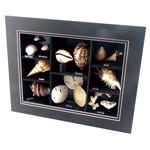
Shadowboxes
When you have collections of shells, coins, feathers, arrowheads and more you can display them in an awesome shadowbox. Flip the Project Base over to the concave side. Use the Backdrop to make “shelves” for your items. Measure and fit the shelves, then glue them inside. Add a matte board frame for the outside.
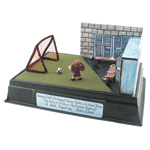
Favorite Book Dioramas
You can make a scene from your favorite book. Jaden, the artist, blended the locker room and soccer field in one scene for a great diorama! Jaden used materials from the Building & Structures Kit to make the lockers, bench and the soccer goal. Plastic mesh was used for the netting on the goal (onions come in plastic mesh bags). The diorama was built on a Project Base & Backdrop and a ReadyGrass Sheet was used for the base cover. The turf was scraped off for the locker room scene and was painted
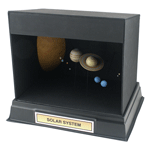
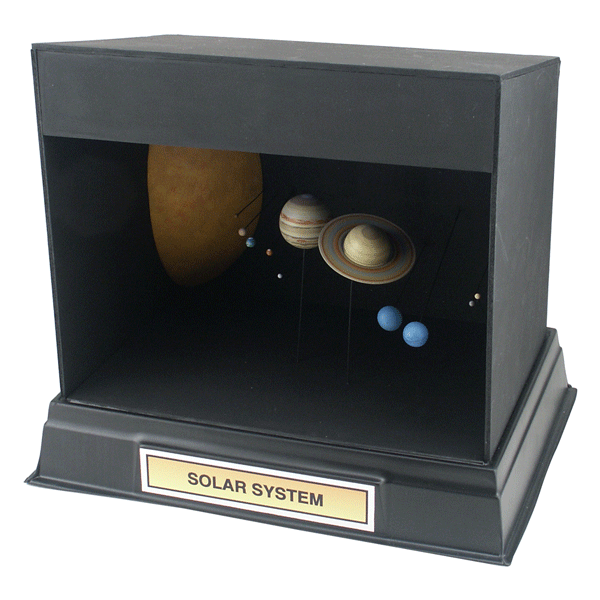
Solar System Dioramas
This diorama sits on a Project Base and the Backdrop was used to make the enclosure. Sculpting Clay was used to create the large sun and the smaller planets. Project Wire was used to suspend the planets and Project Paints were used to paint them. For a star effect, paint the enclosure a very dark black and poke small holes in the background. When viewers look into the diorama, the light shining through the holes look like stars!
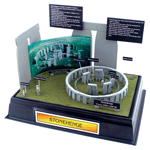
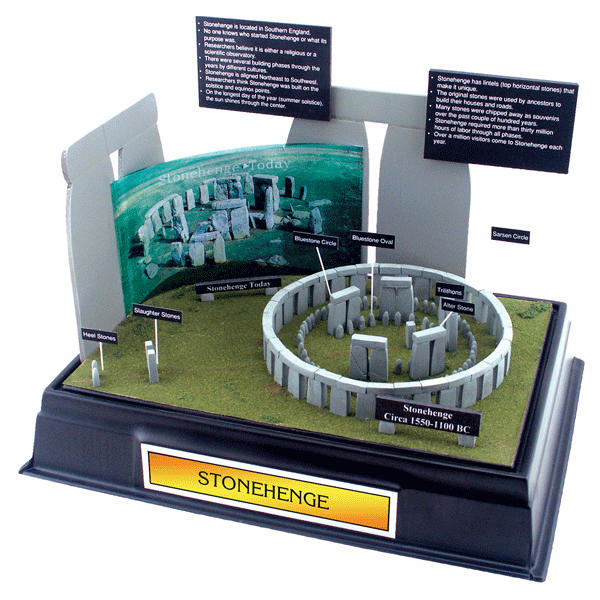
Stonehenge Diorama
This looks like a lot of work, but was very easy to make. Flatten Sculpting Clay and let it dry flat. Cut the stones from the clay and use sandpaper to shape and smooth. Find a photo of Stonehenge in the present state. Use the Project Base & Backdrop to make the base and cut the Backboard in the shape of the stones. Use a ReadyGrass Sheet for the grassy terrain around the landmark. Don’t forget to label your project!

Animal Tracks
Use casting plaster to cast animal tracks. You can also sculpt your own animal paws or feet with Sculpting Clay.
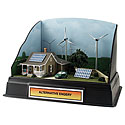
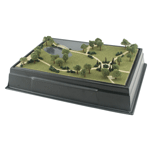
Alternative Energy Dioramas
Your diorama goes green! Overlay the base of a small Project Base and Backdrop kit with a ReadyGrass Sheet and create a wind farm with the Horizon & Detail Kit. Draw, or cut out photos of and paste, three dimensional wind mills and other horizon detail. Build a fence or wall around the yard with backdrop board, landscape with Foliage and Grasses and add a Deciduous Tree or two. Construct a home or other building with the Building & Structure Kit and place the solar panel and windmill Alternative Energy Scene Setters. Use other figures and vehicles to complete your scene.